
Here is some Info I have collected as I learn how to operate a Max NC 10 CL-B benchtop CNC mill.
MaxNC MAX for DOS Power ON, Power OFF step by step:1) Launch the MAX for DOS software.2) Power on the MaxNC mill. 3) Power off the MaxNC mill. 4) ESC and EXIT the MAX for DOS software. MaxNC movement or soft limits:The limit switches on the MaxNC are for establishing HOME and they are not intended to provide a safety shut off in the case of over extension of the range of movement. A soft switch can be set.For MaxIII and Mach III look In the config>homing>limits or XML file. For MaxDOS edit the SERVPR.DAT file. The values are in STEPS, or Travel x Resolution where 1 inch = 4000 steps. Here is an example for a MaxNC 10CL: 11.7 inches = 48600_XTRAVEL 4.5 inches = 18000_YTRAVEL 5.625 inches =22500 _ZTRAVEL MaxNC Drive Belt replacement:Search for these belts from various vendors: e.g.:
http://www.royalsupply.com/store/pc/3M-Polyflex-Belts-c1133.htm Measuring Spindle RPM:The easiest way to determine the true RPM of the spindle ( as compared to the motor's rpm readout ) is to use an inexpensive Laser "No Contact" hand held tachometer. Calculating MaxNC Spindle RPM:The pulleys on both the motor shaft and the spindle are sized to provide 3 choices of rpm. This illustration shows how the MaxNC 10CL-B is set up: Change MaxNC RPM during a cut:Change the MaxNC spindle RPM with a MDI command. Get back to the Main menu, hit 3, and give it an S command- eg: S3000. You can do this in the middle of a program then resume cutting. The current RPM is displayed on the screen, and will change once you do this. Start and Stop MaxNC spindle during a cut:Use Control-S to start and stop the spindlePause MaxNC Feed MOvement during a cut:Use SpacebarMaxNC axis nut adjustment:Take care to make sure that the locknuts on the X and Y axis threaded rods are adjusted so that the bearings remain secure in their mounts.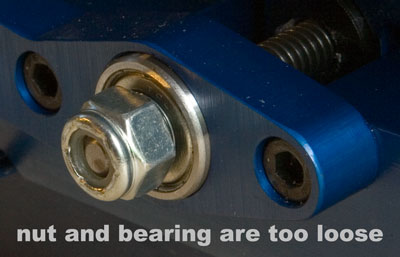 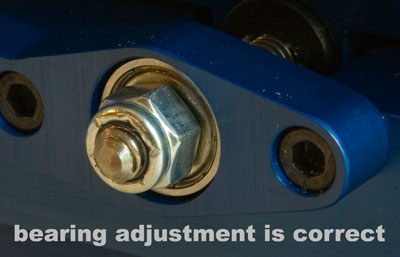 MaxNC T slot and T nut dimensions:The factory supplied MaxNC T slot nuts use 1/4" x 20 t.p.i. threads. This illiustration shows the dimensions of a MaxNC factory supplied T-Nut: MaxNC 10CL BSA or Backlash nut part number and dimensions:The MaxNC 10CL BSA or backlash nut is made by Thomson BSA. It is sourced from the XC Series of Advanced Lead Screw Supernut®s. The Thompson part number is XCT 2520.The BSA nut is attached to the MaxNC body with a screw thread. The thread should be treated with loc-tite to help secure the BSA nut. 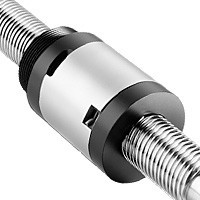  Installation notes for installing the Thomson XCT2520 BSA nutclick here to view and save the installaion instructions that accompanied the Thomson XCT2520 BSA nut replacement parts.Thomson XCT2520 BSA nut spring assembly details:Here are some photos that detail the way the spring fits into the MaxNC's BSA nut assembly.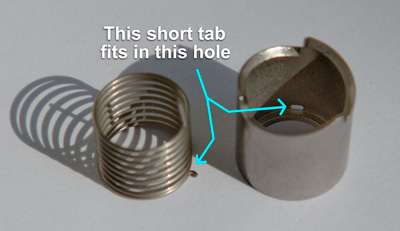 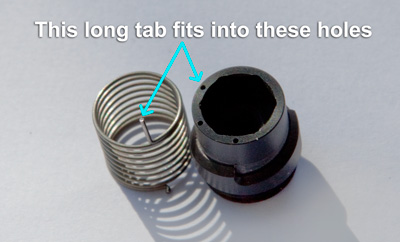 Install "tool" for XCT2520 BSA nut:I use a standard 1/4" x 20 tpi bolt and two nuts locked together to gently drive the BSA nut into the MaxNC body.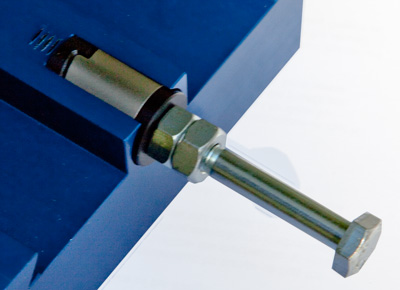 last revised November 3, 2011. |