Motocross
Madness 2
Motocross
Madness 2How to use Custom Objects in MCM2 tracks
mcm2
track
downloads
object downloads
Armadillo info
MCM2 links
This is a tutorial for using .slt model objects in Motocross Madness 2. Here is what to do with MCM2 objects after you have collected them on the net. I am starting with the basics. The really important stuff involves understanding how Armadillo uses Custom objects differently than Stock Rainbow Objects when the Bundle command runs.
![]() Special
credit needs to be given to the twisteddirt.com
crew for figuring out the particulars. This tutorial explains what I have
learned while following the instructions offered in their Original Breakthrough
object tutorial.
Special
credit needs to be given to the twisteddirt.com
crew for figuring out the particulars. This tutorial explains what I have
learned while following the instructions offered in their Original Breakthrough
object tutorial.
The Multi
Object Assisitant Utility has automated most of the details shown
here. The MOA works so well you may not need to bother with info
this detailed.
This stuff is presented for the hardcore track creator. A good understanding
of the basics will keep you out of trouble when managing tracks with custom
objects.
***********************************************************
***********************************************************
INTRO:
To begin;
Make sure the .slt object file is accompanied by a 24bit .tga texture
map and a 24bit _art.tga Armadillo preview file. Place the Object's three
files in: ~yourMCM2directory~/TrackEditor/UserModels folder For example
here is an object and the necessary targa files:
IMPORTANT:
The .slt file and the _art.tga file must have the same names or you will
not see a preview image in the Armadillo Custom Objects editor.
HOT TIP: Note the file name on the .slt file, It uses a suffix: "01_01" A naming convention like this is very useful when using multiple instances of an object.
SLT FILE BASICS: A .slt file is a 3d object in a file format called Soultree. It primarily describes the geometry of the model. It contains the texture mapping coordinates and addresses a associated .tga texture map. You may copy and rename .slt files and think of them as unique models as long as you maintain their association with a texture map. Armadillo requires a 24bit 133x103 pixel ~_art.tga preview image for each ~.slt file in the /UserModels folder so it can display the object as a choice in the Armadillo Custom Objects menu. If a ~.slt file is unaccompanied by a ~_art.tga preview image than the menu will display a default image that reads: "art not available". The model may still be available for use.
END INTRO
*********************************************************** ***********************************************************
TEXTURE MAPS:
Take a look at a .slt file in a text editor. Here is the top part of hchaybale01_01.slt viewed in Notepad:
I have highlighted
the line that targets the texture map.
The .tga image is used in two different ways...
1)The Named .tga file must be available for Armadillo so that the object
will be visible and textured in the Editors View. Armadillo looks for
the .tga file in: ~yourMCM2directory~/TrackEditor/UserModels
2)The Named .tga file must be included in the MakeCMP process (more on
that later)
There are some cool ways to use the Targa textures to maximize efficiency
and variety. Multiple SLT objects files may point at the same .tga Texture
Map. This technique conserves graphics memory during game play. You can
create a variety of texture maps and Skin a model with many different
looks. You may edit the Texture Map line in the .slt file and point to
a custom targa skin to make a new "Custom" object.
Custom Texture Maps should be square and have to use the original UVW
coordinates in the .slt file. Mimic the original texture map's layout
or use a template if possible. Maps can be scaled: Use more pixels for
greater detail and less for faster graphics rendering.
HOT TIP: Use this Name Convention when using custom skins to make "Custom"
objects. Consider, for example, the hchaybale03_01.slt file. Copy the
file and name it something like: hchaybale03_02.slt The "03_01" style
suffix is helpful when you prepare to bundle the project. The first part
or "03" refers to the texture map and the second part "_01" refers to
the instance.
i.e. hchaybale03_01 is the first object placed using the "03" texture map while hchaybale04_08 is the eighth object using the "04" map etc.
END TEXTURE
MAPS *********************************************************** ***********************************************************
The BIG SECRET ABOUT CUSTOM OBJECTS IN ARMADILLO:
The Big
Secret.....My compliments to the twisteddirt.com
crew for sharing the goods. Armadillo seems to work OK with Custom Objects.
You can preview, place and edit instances of a custom object in a project.
They appear and behave just like the stock static model objects. But.......
There is a surprise when you try to bundle a track with a Custom Object.
The tracks will crash MCM2 if you have not prepared your project files
properly. The twisteddirt.com
crew discovered that the ~.ini file in your project folder needs to have
info added before you can bundle a project properly. In addition The twisteddirt
crew revealed the secret for using MULTIPLE INSTANCES of a custom object.
The ~.scn file needs to be edited with specific changes made to the text
lines that address the .slt files.
Just so it is clear... If you place any object in more than a single instance
than it is a MULTIPLE INSTANCE.
Stock objects readily bundle when configured in multiple instances. Custom
objects however are problematic when bundled in multiple instances. Armadillo
presents a special challenge to track creators. A problem arises every
time you save your project in Armadillo. As you edit various aspects of
your project you must save the work. The save command updates and overwrites
many of the files contained in your project folder. Of special interest
is the fact that the ~.ini file is overwritten each time and you will
find it is saved with inadequate information. You must edit and add text
lines within the .ini file. The ~.scn file will also need to be edited
outside of Armadillo before you can bundle a successful track.
You must edit the ~.ini and ~.scn files just before you bundle but after
you save your project.
Here is a way to do it:
Armadillo is open, your ~yourprojectname~ project is finished, and you
want to ride it in MCM2. Save your ~.prj file and immediately exit Armadillo........
END BIG SECRET
*********************************************************** ***********************************************************
EDIT .SCN FILE
Now you must edit and update the ~.scn file. Here is what a portion of a .scn file looks like in a text editor:
 I
have highlighted the lines that Identify each object instance. Notice
that instances are listed with location coordinates, etc. The stock objects
provided by Rainbow Studios have .slb extensions while the Custom Objects
use a .slt.
I
have highlighted the lines that Identify each object instance. Notice
that instances are listed with location coordinates, etc. The stock objects
provided by Rainbow Studios have .slb extensions while the Custom Objects
use a .slt.
Multiple instances of the the same stock .slb objects all use the same name and share the geometry of a single .slb file. BUT, and here is the tricky part, Multiple instances of the same custom object must be reassigned to unique .slt object files. You must create and name additional copies of the custom .slt files in your TrackEditor/UserModels folder. The easiest way to determine how many copies you require and what names to use is to work through the text of the ~.scn file
A Objects
Tutorial Stunt Project:
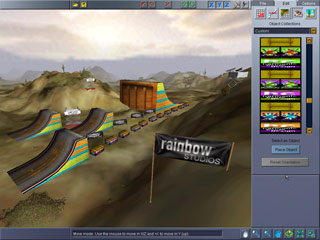
Here is use a simple project to use as an example in this tutorial, it
is named "A Object Tutorial" Stunt Quarry. The project file is named aobjtutorial.prj.
The picture shows a few models placed close to each other. These
are the only models in the whole project so it will be easy to keep track
of everything.
For the sake
of discussion here is a list of the models shown:
3x - CameraPlatform01.SLB
5x - Billboard_Rainbow.SLB
3x - hcfree-med-ramp01_01.SLT
1x - hcfree-vbig-ramp01_01.SLT
6x - hchaybale030_01.SLT
5x - hchaybale050_01.SLT
Now lets look in the Project Directory and see the collection of files that make up this project.
 The
aobjtutorial.tga and the aobjtutorialS.tga image files are the preview
ID images presented in the MCM2 event menu. The images must be created
and placed in the project folder BEFORE running the bundle command. If
you forget to add the ID targas then Armadillo will use the default Race
ID Artwork and you will need to re- Bundle. The ID images are both 16
bit .tga format. The full size picture is 452x220 pixels and the smaller
~S.tga is 286x139 pixels.
The
aobjtutorial.tga and the aobjtutorialS.tga image files are the preview
ID images presented in the MCM2 event menu. The images must be created
and placed in the project folder BEFORE running the bundle command. If
you forget to add the ID targas then Armadillo will use the default Race
ID Artwork and you will need to re- Bundle. The ID images are both 16
bit .tga format. The full size picture is 452x220 pixels and the smaller
~S.tga is 286x139 pixels.
This project uses Custom Objects so the Usermaps.cmp and Usermaps.tex files need to be added before running the bundle command. These 2 files are generated in a separate process using the MakeCMP.exe freeware and must be added to the project directory manually. The files can be added at any time but it is easy to wait until you are ready to bundle. The MakeCMP process is discussed in detail later.
Its time to inspect the text within the original aobjtutorial.scn file: click here to open a blank window with the .scn file displayed as text.
Take a quick look and indentify the Custom .slt Models and the Stock .slb Models. The editing is only required with the .slt Models. Leave the .slb stuff alone. The next step is to search the entire contents of the .scn file in order to identify and rename MULTIPLE INSTANCES of a custom object so that each instance addresses a uniquely named .slt object file.
!!!!! The files that are addressed must, of course, be created at some point.....it is easy to do this after going through the complete ~.scn file. !!!!!
Use the Search/Find function in Notepad to work through a .scn files text and carefully rename each instance of every object file.
HOT TIP:
AhaaaaaaaaaaHHHHHHHHH.....
Here is where the Naming Convention I have suggested will really help
save time and effort. Consider the object named hchaybale03_01.slt, In
this project we have 6 Multiple instances, and each Instance needs to
be edited have a unique name. It is easy to keep track of the instances
if the names remain associated to the texture map they share. Thus all
instances of the hchaybale03_~.slt "object style" (if you will...) should
SHARE THE SAME .tga TEXTURE MAP. This makes it easier to keep track of
the objects. Each instance can be named hchaybale03_01.slt, hchaybale03_02.slt,
hchaybale03_03.slt, etc., etc.
The final _~~ portion of the Naming Convention suffix identifies the actual
instance of any given object style.
This Naming Convention allows for 99 Instances of 99 different object
styles and easily lends itself to expansion.
!!!This step
is very important any oversight or error will result in a track that crashes
MCM2.!!!
Start at the top of the the .scn file, search thru for each object style
and rename all the instances until you are sure that each instance of
a custom .slt file has been addressed to a individual and unique name.
!!!This step is very important any oversight or error will result in a
track that crashes MCM2.!!!
Compare the original aobjtutorial.scn file on the left to the edited aobjtutorial.scn file on the right:


Now you must inventory the Object Instances so that you may make copies of the actual .slt files, name them appropriately, and place them in your \TrackEditor\UserModels folder.
A count
from the updated .scn file shows the project uses these custom .slt files:
hcfree-vbig-ramp01_01.slt
hcfree-med-ramp01_01.slt
hcfree-med-ramp01_02.slt
hcfree-med-ramp01_03.slt
hchaybale03_01.slt
hchaybale03_02.slt
hchaybale03_03.slt
hchaybale03_04.slt
hchaybale03_05.slt
hchaybale03_06.slt
hchaybale05_01.slt
hchaybale05_02.slt
hchaybale05_03.slt
hchaybale05_04.slt
hchaybale05_05.slt
NOTE: The .scn file accumulates all the data as you edit your project
in Armadillo. The .scn file must ultimately be reconciled with the inventory
procedure before bundling. You can use the Naming Convention as an aid
to help identify and manage the various custom object instances. Perhaps
you see why it makes sense to wait on editing the other files until you
have worked thru the .scn file?
Its Ok to run the MakeCMP process now but you can wait a while as well. The MakeCmp process is discussed in detail later.
END EDIT
.SCN FILE ***********************************************************
***********************************************************
UPDATE the UserModels FOLDER
The "bundle-ready" aobjtutorial.scn file points to unique .slt files in the TrackEditor/UserModels folder. Take a look at the contents of this UserModels folder.
 This
view has been simplified because only the models used in the project are
in the folder. A typical UserModels folder can have a lot more stuff in
it. Use the model count from the .scn file as a reference. Copy, paste,
and rename the actual .slt files in order to assemble a appropriate number
in the UserModels folder as shown here.
This
view has been simplified because only the models used in the project are
in the folder. A typical UserModels folder can have a lot more stuff in
it. Use the model count from the .scn file as a reference. Copy, paste,
and rename the actual .slt files in order to assemble a appropriate number
in the UserModels folder as shown here.
![]() HOT
TIP: I use and recommend a Marvelous piece of freeware known as CKRename.
It is a file renaming utility with great sequential numbering features.
I use it when making and renaming multiple copies of files, it saves a
lot of time. You can download and learn more about CKRename at
the official CKRename
home page.
HOT
TIP: I use and recommend a Marvelous piece of freeware known as CKRename.
It is a file renaming utility with great sequential numbering features.
I use it when making and renaming multiple copies of files, it saves a
lot of time. You can download and learn more about CKRename at
the official CKRename
home page.
 Here
is the same folder after all the models have been copied. Notice that
there are no additional texture maps. The .slt copies share the original
.tga image. Notice as well, that there are no additional ~ _art.tga images.
The 133x103 pixel preview images are used in the objects selection menu.
You may create and name relative copies of the preview image for each
unique model or you may not. Armadillo will display a default image stating
"art not available" for any .slt model in the UserModels folder that is
not accompanied by a _art.tga. The _.tga is a 41KB file. Redundant use
of the preview image in the Custom Objects menu seems to strain Armadillo's
memory management. The model will be available to the editor and bundler
even without the preview picture.
Here
is the same folder after all the models have been copied. Notice that
there are no additional texture maps. The .slt copies share the original
.tga image. Notice as well, that there are no additional ~ _art.tga images.
The 133x103 pixel preview images are used in the objects selection menu.
You may create and name relative copies of the preview image for each
unique model or you may not. Armadillo will display a default image stating
"art not available" for any .slt model in the UserModels folder that is
not accompanied by a _art.tga. The _.tga is a 41KB file. Redundant use
of the preview image in the Custom Objects menu seems to strain Armadillo's
memory management. The model will be available to the editor and bundler
even without the preview picture.
!!!!!!!!!!!!Tips for Managing data in the UserModels folder!!!!!!!!!!!!!!!!
Consider the workflow suggested and described in this tutorial... Armadillo works fine with multiple instances of a custom object but the MCM2 game does not. Armadillo gets cranky when you fill the UserModels folder with multiple copies of models and preview images. So..... it seems reasonable to avoid adding the extra copies until absolutely necessary. This is why the tutorial recommends completing all the editing before preparing to bundle. In practice this can be difficult to do, there always seems to be some tweak, change or edit that you wish to perform after you have added all the object copies and overloaded Armadillo. For the most part you can reopen the projects and work normally. Just be sure to keep track of your instances and model names if you add or delete a object. You will probably notice Armadillo is sluggish. If you amass a large collection of UserModels (its easy to do, 130 haybales goes like THAT :-} ). you will certainly see Armadillo get slower. This situation can be managed by creating Temporary UserModel folders that can be switched out as different projects are active.
!!!!!!!!!!!!Tips for Managing data in the UserModels folder!!!!!!!!!!!!!!!!
END UPDATE
the UserModels FOLDER ***********************************************************
***********************************************************
MAKECMP
 The
MakeCMP process may be performed when ALL the Custom Object texture maps
are identified. The process compiles a collection of the Custom Textures
maps and generates two files: UserMaps.cmp and UserMaps.tex Here is the
way to do it: Locate a copy of MakeCMP.exe and the original UserMaps.ini
file that is included with the download. Create a folder and name it something
like: "Temporary_MakeCMP"
The
MakeCMP process may be performed when ALL the Custom Object texture maps
are identified. The process compiles a collection of the Custom Textures
maps and generates two files: UserMaps.cmp and UserMaps.tex Here is the
way to do it: Locate a copy of MakeCMP.exe and the original UserMaps.ini
file that is included with the download. Create a folder and name it something
like: "Temporary_MakeCMP"
 Place
a copy of each .tga texture map used in the project in this temporary
folder.
Place
a copy of each .tga texture map used in the project in this temporary
folder.
Do not include the _art.tga preview images.
Place a copy of the UserMaps.ini file in the same temporary folder. The
UserMaps.ini file may be used as is with no modification.
The
temporary folder should contain ONLY the texture maps and the UserMaps.ini
file.
Run MakeCMP.exe,
Click the ".ini file" button in the dialog box to browse and select the UserMaps.ini file in the temporary folder. Click the "process" button. When the script is finished you may exit the program.
 Open
the temporary folder and note the addition of several files. Copy the
Usermaps.cmp and UserMaps.tex files.
Open
the temporary folder and note the addition of several files. Copy the
Usermaps.cmp and UserMaps.tex files.
Place Copies of the Usermaps.cmp and UserMaps.tex files within the project folder as shown:
That is how you perform the MakeCMP process. You may discard or store the temporary folder. You may continue to edit within the project normally. The MakeCMP process only needs to be repeated if you want to change a Texture map.
END MAKECMP
*********************************************************** ***********************************************************
EDIT .INI FILE
Look at the contents of a recently saved .ini file: